How to install Oracle 12C in a Linux environment
Hello i'm Kavindu Dulanjana and this blog contains all the necessary steps that should be followed in order to successfully install Oracle 12C in a Linux environment in a computer. For this process CentOs7 will be the Linux operating system that will be used and VMware Workstation will be used to run Linux Virtually. The first few steps include downloading of the requires sofwares so if you already have these softwares installed skip to STEP 3.

Step1: Downloading Softwares
Step2: Setting up and creating a virtual machine
Step3: Installing and updating CentOs 7 files
Step4: Creating New user Oracle
Step5: Setting the kernel parameters
Step6: Setting limits to Oracle
Step7: Copy Oracle to Linux
Step8: Extracting the Files of oracle setup
Step9: Create the directories that will be needed
Step10: Run the installer
Step11: Running Oracle setup in the GUI
Step12: Downloading and updating Adobe Flash Player
Step13: Open ports
Step14: Edit .bash_profile
Step15: Replace local host
Step16: Reload .bash_profile
Step17: Export
Step18: Start SQL
Step19: Enter Listener
Step20: Logging in from port 5500
Step21: Opening ports 5501 and 5502
Step 1:
Download CentOS7 which is a free Linux operating system (make sure it supports GUI) and the Oracle 12C software for Linux operating systems (zipped). We can use this ISO to install it in a virtual machine.


Step 2:
Download and Open VMware Workstation and create a new virtual machine. We will be installing the CentOS7 operating system that we have downloaded earlier, to this virtual machine.
Once you start creating a new virtual machine, You will get the following messege. Run the Typical Installation method

Select the CentOs7 disk image that you have downloaded from the relevant location.

Provide a name for the virtual machine and a location for it to be installed. Next set the disk space to 80Gb, RAM as 2GB and store it in a single location. Once its done press FINISH and power on the virtual machineand the installation will begin.

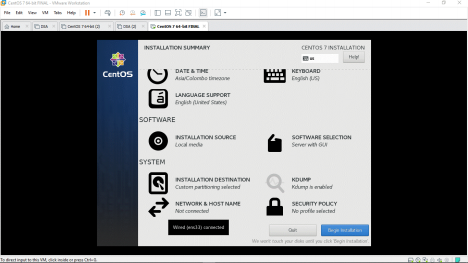
When the centOs7 installation window appears make the following changes.
1. Set the proper date and time
2. keyboard to English US
3. Software selection should be the server with GUI
4. The disk must be portioned as
a. Data /home 40GB
b. System /boot 4072MB
c. System/ 30GB
d. System Swap 4072MB
5. Enable network
Then click on Begin Installation
Step 3:
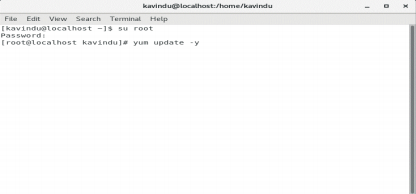
Once the installation is done, right click in the CentOs desktop and enter the Terminal and enter the following commands.
1. First switch to root by entering the command
su root and enter the root access password.
2. Then we must update the packages to the latest level. use the command
yum update –y
3.
Then install the relevant packages and zipped and unzipped files by entering the
following command.
yum install -y binutils.x86_64 compat-libcap1.x86_64 gcc.x86_64 gcc-c++.x86_64 glibc.i686 glibc.x86_64 glibc-devel.i686 glibc-devel.x86_64 ksh compat-libstdc++- 33 libaio.i686 libaio.x86_64 libaio-devel.i686 libaio-devel.x86_64 libgcc.i686
libgcc.x86_64 libstdc++.i686 libstdc++.x86_64 libstdc++-devel.i686 libstdc++- devel.x86_64 libXi.i686 libXi.x86_64 libXtst.i686 libXtst.x86_64 make.x86_64 sysstat.x86_64 zip unzip
Step 4:
Once the process is complete create a new user account called Oracle by entering the following commands.
groupadd oinstall
groupadd dba
useradd -g oinstall -G dba oracle
Then use the command passwd oracle to set a password for the user account.
Step 5:
Insert the following kernel parameters into the sysctl.conf file.
First enter the following command vim /etc/sysctl.conf to enter the sysctl.conf file. Then enter the following parameters. Then press :x to save and exit fs.aio-max-nr = 1048576
fs.file-max = 6815744
kernel.shmall = 2097152
kernel.shmmax = 8329226240
kernel.shmmni = 4096
kernel.sem = 250 32000 100 128
net.ipv4.ip_local_port_range = 9000 65500
net.core.rmem_default = 262144
net.core.rmem_max = 4194304
net.core.wmem_default = 262144
net.core.wmem_max = 1048586
Then apply the following Kernel parameters by entering the following comands.
sysctl –p
sysctl –a

Step 6:
Set the limits for Oracle in the limits.conf file. First enter the limits.conf file by entering the command vim /etc/security/limits.conf and then enter the following values.
oracle soft nproc 2047 oracle hard nproc 16384 oracle soft nofile 1024
oracle
hard nofile 65536

Step 7:
Copy the oracle file that you downloaded to CentOs. In my
case I saved it in the Downloads folder.

Step 9:
Before proceeding to the installation the following
directories must also be made. Use the following commands.
mkdir /u01 mkdir /u02
chown -R oracle:oinstall/u01
Step 10:
Now run the Oracle 12C
installer by enter the following command ./runInstaller by right
clicking on the database and
entering the terminal.
Step
11:
After the required checkup the setup program will start. Here uncheck the ‘I wish to receive security updated via my oracle support’ checkbox and continue.

Next in the installation options select ‘create and configure database’ option.
In the typical installation window select the following locations, group, and database name and provide other relevant details accordingly, for installation.

Then after the filling the proper details the program will
run the prerequisite checks and if compatible it will output the summary of
details as follows.

Next you can click Install to start installation.
Once the installation reaches about 79% the setup will prompt you to enter certain scripts in the root user terminal therefore copy and paste the following scripts to execute them. Then go back to the installation window and press ‘OK’.

Step 12:
In order to proceed you may need adobe flash player therefore download and update flash player by applying the following commands on the home terminal.
rpm -ivh http://linuxdownload.adobe.com/adobe-release/adobe-release-x86_64-1.0-1.noarch.rpm rpm --import /etc/pki/rpm-gpg/RPM-GPG-KEY-adobe-linux yum update
Step 13:
To allow connections from outside you have to open the following ports.
firewall-cmd--zone=public --add-port=1521/tcp --add-port=5500/tcp --add-port=5520/tcp --add-port=3938/tcp –permanent firewall-cmd –reload

Step 14:
Add the following lines to the .bash_profile file. First enter the vi /home/oracle/.bash_profile command in the terminal to enter the .bash_profile file.
TMPDIR=$TMP; export TMPDIR
ORACLE_BASE=/u01/app/oracle; export ORACLE_BASE
ORACLE_HOME=$ORACLE_BASE/product/12.2.0/dbhome_1; export ORACLE_HOME
ORACLE_SID=DSAIT1936087; export ORACLE_SID
PATH=$ORACLE_HOME/bin:$PATH; export PATH
LD_LIBRARY_PATH=$ORACLE_HOME/lib:/lib:/usr/lib:/usr/lib64; export LD_LIBRARY_PATH
CLASSPATH=$ORACLE_HOME/jlib:$ORACLE_HOME/rdbms/jlib; export CLASSPATH

Step 15:
Then replace the local host with 0.0.0.0 Enter the command
vi $ORACLE_HOME/network/admin/listener.ora in the terminal and replace host with 0.0.0.0

Step 16:
Reload the .bash_profile with the new settings by
applying the following command in the terminal. source .bash_profile
Step 17:
Enter the following commands in the terminal.
export ORACLE_HOME=/u01/app/oracle/product/12.2.0/dbhome_1
export PATH=$ORACLE_HOME/bin:$PATH
export ORACLE_SID=DSAIT1936087

Step18:
Enter the following commands in the terminal.
sqlplus / as sysdba
startup
alter user SYSTEM identified by dsa123;
alter user SYS identified by dsa123;
Step 19:
Enter the command exit then in terminal enter the command lsnrctl start
Step 20:
Now enter the following URL and enter the website https://localhost:5500/em and
login using the Username SYS and password dsa123
Step 21:
Likewise do the following steps to log into https://localhost:5501/em
Firstly log out of the current account and in the terminal type the following commands
sqlplus / as sysdba startup
shutdown immediate
exit
Step 21: continue
Similarly do the following steps done in step 20 to log into https://localhost:5502/em

Now you installation is complete and if you have any questions feel free to contact me.
I am always open for suggestions and ideas so feel free to let me know your ideas or recomendations.

Comments
Post a Comment